
After watching “Getting Started” video, move on to “How To Make an 8 Strand” or “How To Make a 12 Strand” for complete steps.
How To Make an 8 Strand
How To Make a 12 Strand
STAGE 1:

Attach the blue arm to the base.

Flip white arm tab up. Push white arm down with finger.

Turn handle clockwise.

Keep turning until blue spool gaps and blue posts are lined up at the top and bottom of the machine.
STAGE 2:

Select a bracelet design from the design booklet and count out the colored spools needed.

Gather your materials. Safety scissors required, not included.

Hold spool with string end facing out.

Insert spool into spool holder until it clicks in place following the design template.
TIP: For easy loading turn spool holder around so that it faces out.

Remove string from spool groove.

Feed string out through the top of the spool holder.

Using both hands, push string through the curved opening of the blue hoop.

Slide string into string clip.
* Adult assistance may be required.

Turn spool dial to adjust string length and tightness.

The string end should fall between the black lines as shown in above image.

Load KumiKreator™ with the rest of the spools following your bracelet design.

Push white arm tab down, to unlock white arm.

Time to spin! Turn the handle and watch as the KumiKreator™ magically braids your friendship bracelet.

When the red lines meet, your bracelet is finished braiding.
STAGE 3:
Peel a clasp sticker.

Pinch sticker tightly around the braid, just below white arm tab.
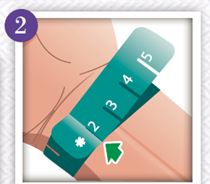
Use the measuring guide to find out your size. Wrap around your wrist and slide the star into the size number that fits.

Measure bracelet length using the measuring guide. Hold the star right below the clasp sticker.

Place another clasp sticker at the bottom of the bracelet, just below your size number.

Pull the white arm tab back to unlock the bracelet.

Slide bracelet out from string clip.

Pull each string out of its spool and remove bracelet from KumiKreator™.

Trim bracelet with scissors on the outside of each sticker.

Take apart a clasp.

Insert by twisting smaller side of clasp into a bracelet end.

Pull bracelet out

Place an end cap below the sticker.

Pull the end cap into the clasp.
TIP: Trim excess string for best results.

Repeat on the other end to finish your bracelet!
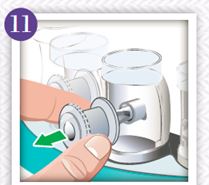
Remove the empty spools from the spool holders.
Follow Stages 1-3 to create a new bracelet.